

So, you want to get started reverse engineering malware. Great! There's a sea of malware out there, and hidden within it are insights that could greatly benefit the cybersecurity community as a whole. But there's a problem: reverse engineering is hard. In fact, making sense of code you wrote yourself six months ago can be challenging. Now imagine trying to understand something built by someone actively working to sabotage your efforts.
Reverse engineering is the process of taking something apart to understand how it works. In a non-security context, engineers might reverse engineer hardware to replicate a competitor's designs (check with your lawyer first), or analyze closed-source protocols to build compatible software. Security researchers use reverse engineering to discover exploitable vulnerabilities, or to instrument and secure systems where the source code isn't available.
This guide focuses on reverse engineering malware. On the defensive side, analysts reverse engineer malware to extract indicators of compromise (IOCs) for detection and prevention, assess threat group capabilities, track campaign activity, and understand attacker tactics to educate defenders. On the offensive side, red teams and penetration testers may reverse engineer malware to emulate specific threats and test defenses.
Static Analysis vs. Dynamic Analysis
Reverse engineering broadly falls into two categories: static analysis and dynamic analysis. You’ll usually use both.
Static Analysis
Static analysis means examining the malware without running it. You're looking at the binary as a file, studying its structure, and any artifacts it contains. Static analysis techniques include:
- Hashing: Computing cryptographic hashes (MD5, SHA-1, SHA-256) of files lets you quickly determine if a sample is known malware by comparing it to threat intelligence databases.
- Scanning: YARA rules allow us to identify malicious strings and byte sequences using logical conditions. While an attacker can change a file hash with a single byte, evading YARA logic is much more complex, and not always possible depending on the context.
- String extraction: Running the
stringscommand (or equivalent tools) reveals human-readable text embedded in the binary. This can expose domains, IP addresses, registry keys, function names, error messages, and more. - Disassembly and decompilation: Tools like Ghidra and IDA Pro convert machine code into assembly language (disassembly) or attempt to reconstruct higher-level pseudocode (decompilation). You can then read through the assembly and trace execution, or how it would execute, in something called a control flow graph.
Sometimes static analysis is good enough. If the file’s hash is known-bad, it’s probably not worth the time and effort to look further. It’s also a good way to understand what exactly the program or script may do when you load it up. When analyzing something complex, you’ll usually annotate and study the program in IDA or Ghidra. As you work through, you’ll use a debugger or instrumentation when necessary or expedient.
Dynamic Analysis
Dynamic analysis means running the malware in a controlled environment and observing its behavior.
Sandboxes: This is by far the most common dynamic analysis technique. Automated systems execute malware in isolated virtual machines and monitor its behavior, logging file system changes, registry modifications, network connections, process creation, and API calls. There are tons of free online sandbox services available.
Debuggers: Debuggers let you run the malware step-by-step, inspect memory, set breakpoints, and watch how data flows through the program in real-time. This is more hands-on than sandboxing and gives you deep control. Common debuggers include x64dbg and WinDbg for Windows and GDB for Linux.
Dynamic analysis can be much faster than static analysis. However, sophisticated malware can detect sandbox environments (through VM artifacts, timing checks, or user interaction requirements) and alter its behavior to evade detection. Debuggers are used to uncover things a sandbox may have missed and to understand how the malware actually functions rather than just what it produces.
Advanced Tools
As you gain experience, you'll want to automate aspects of your workflow. Sometimes you need to write custom scripts or use specialized frameworks.
Frida: A dynamic instrumentation toolkit that lets you inject JavaScript into running processes. Instrumentation just means we're adding our own code into specific areas of the program. This lets us inspect or modify data without halting execution. We can place hooks, for example, at the beginning of interesting functions to inspect function arguments or study program flow.
Unicorn Engine: A lightweight CPU emulator that we use in our own in-browser debugger on ACE Responder. Unicorn lets you emulate specific functions or code snippets without running the entire binary. This is useful for safely executing malicious code in isolation or analyzing shellcode. You'll likely encounter emulators when you have a specific use case that requires them.
Scripting and Automation: As you reverse engineer more samples, you'll encounter repetitive tasks like renaming functions, extracting shellcode, or decoding obfuscated sections. Python is the most popular option with libraries like pefile, capstone, angr, and Ghidra's scripting API.
Language-specific Tools: Although we're mainly talking about reverse engineering binaries, not all malware is compiled to native code. Some malware, or its components, are written in .NET, Python, PowerShell, or JavaScript. For these, you'll use different tools (like dnSpy for .NET or simply reading the script for interpreted languages).
What It Takes to Get Good at Reverse Engineering
The big question you probably have on your mind is "Do I need to learn how to code to get good at reverse engineering?" The answer is yes. But you don't have to delay learning reverse engineering until you're proficient at coding. In fact, it's probably best to learn them together, provided you start with exercises that are skill-appropriate and escalate gradually as you improve.
When you first start out, you need practice with many binaries. Start with simple crackmes (challenge programs designed for learning reverse engineering). As you progress, try to follow along with malware analysis blogs by threat intelligence companies like CrowdStrike, Elastic, Palo Alto, etc. You don't necessarily have to be choosy—just pick one that interests you and move on when you get stumped.
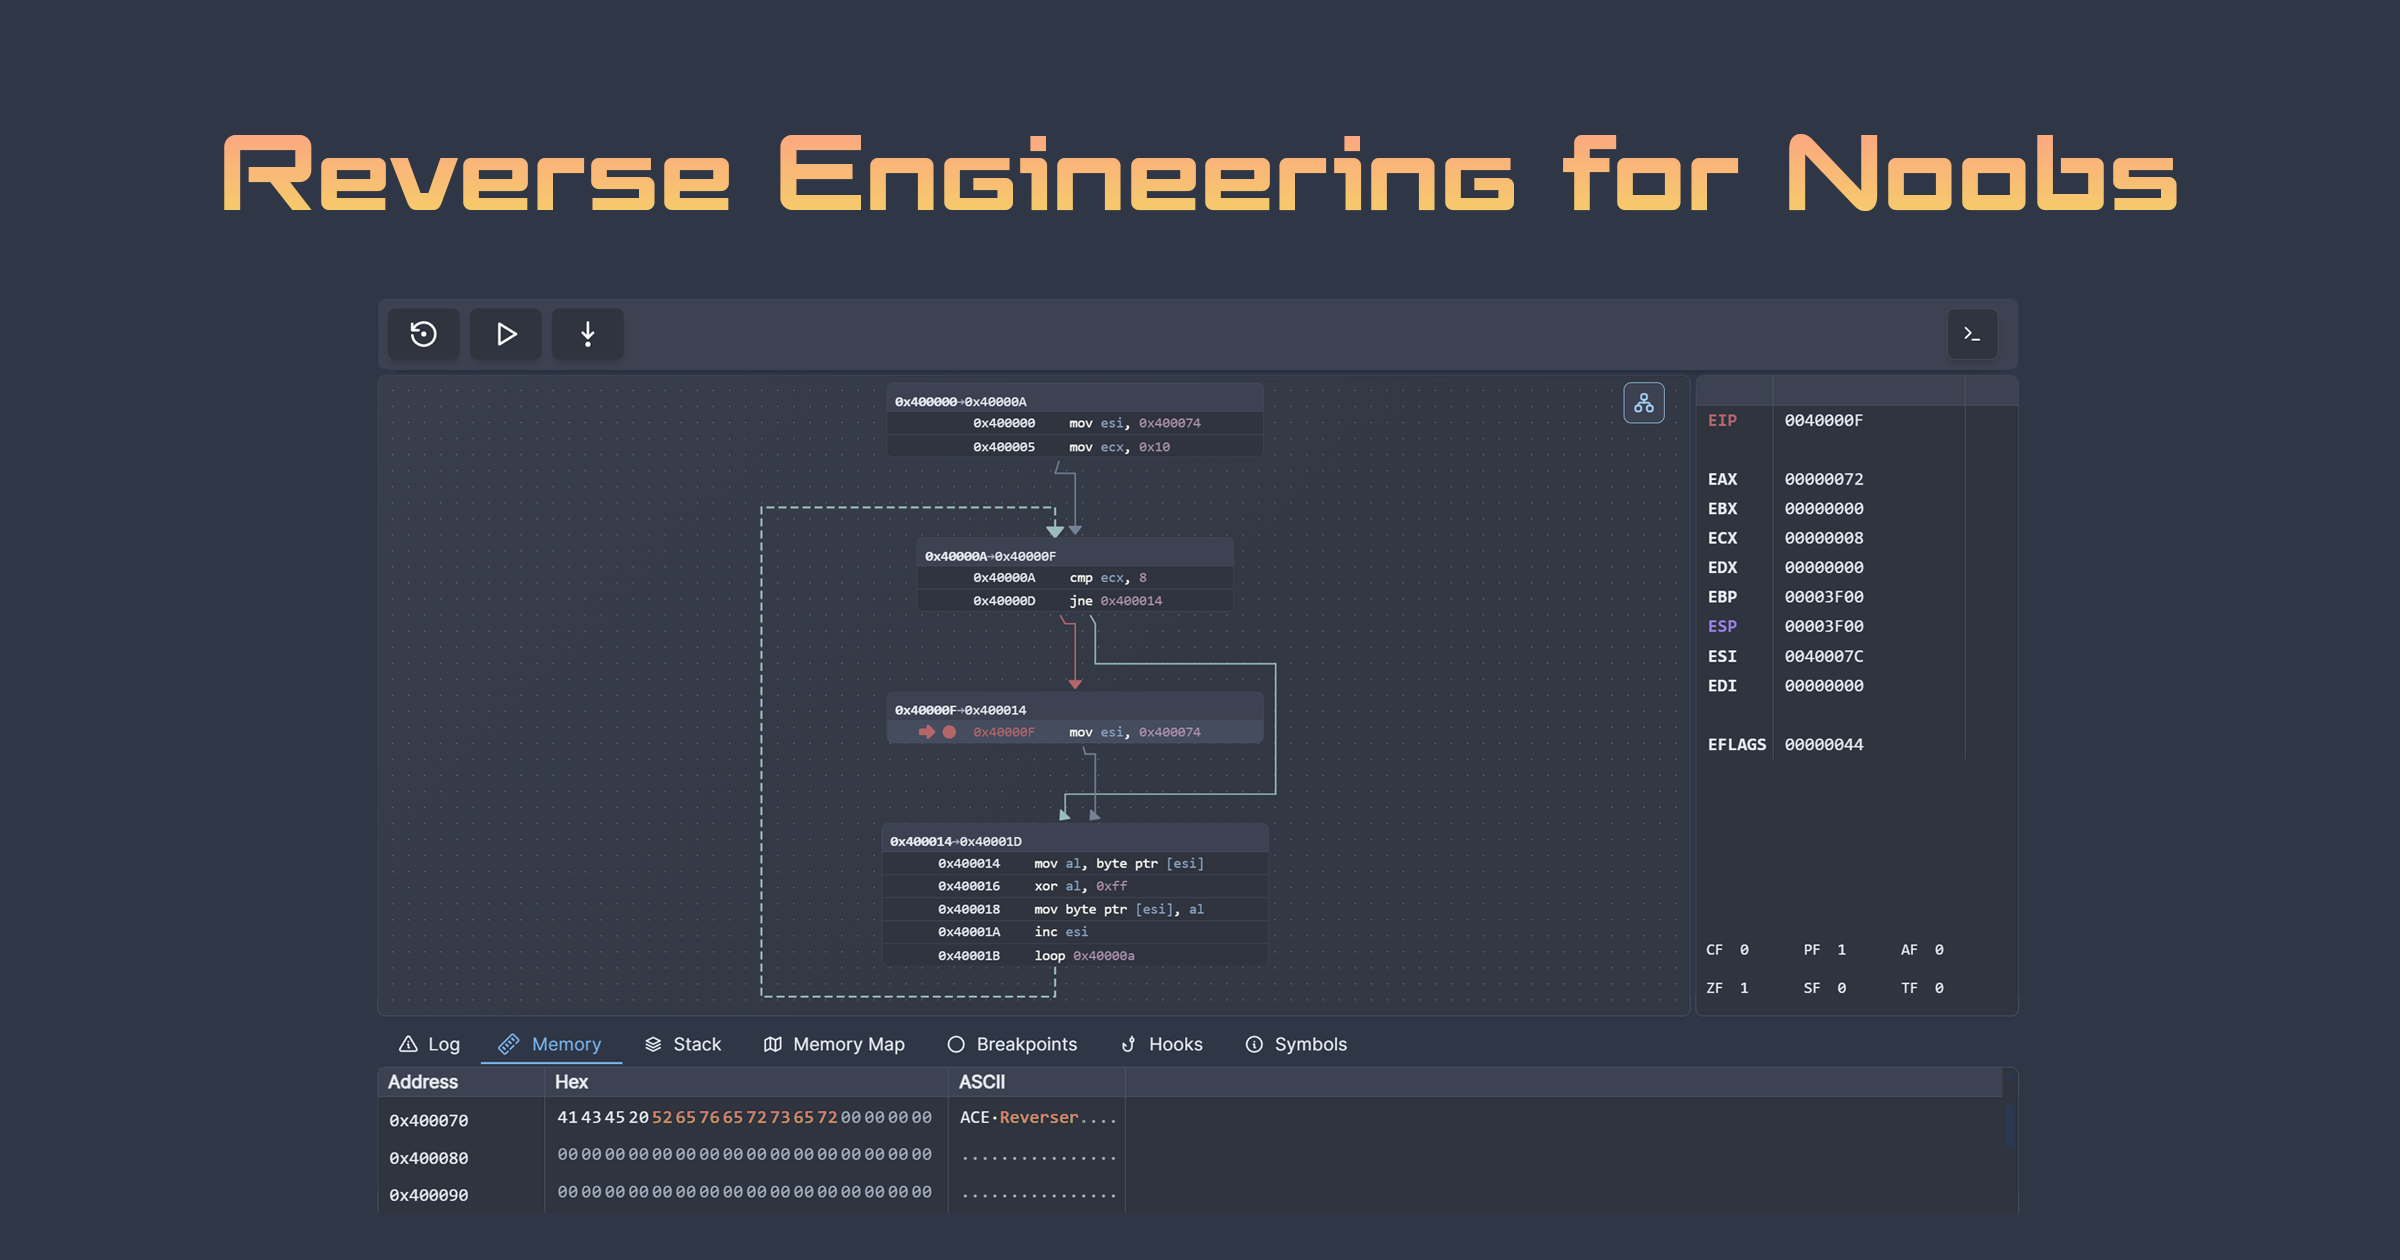
Reading blogs and tutorials can be helpful, but there's a reason the term "tutorial hell" exists. You have to actually do it to get good at it. This is why we've created a free introductory module that walks you through reverse engineering with assembly in an in-browser debugger. No need to download malware or worry about accidentally pwning yourself. You can step through code, inspect memory, and understand how assembly instructions work in a safe environment.
Understanding Assembly Language
Before you jump into the exercises, here's some prerequisite knowledge you'll need.
CPU Architecture: x86 and x64
The most common architecture you'll encounter is x86, which refers to Intel and AMD processors based on the x86 instruction set. This architecture comes in two flavors:
32-bit (x86/IA-32): Uses 32-bit registers (4 bytes each). A 32-bit register can hold values from 0 to 4,294,967,295 (0xFFFFFFFF). These systems are increasingly rare but still show up in legacy malware and embedded systems.
64-bit (x64/AMD64): Uses 64-bit registers (8 bytes each), providing access to vastly larger numbers and memory addresses. This is the standard for modern Windows, Linux, and macOS systems.
64-bit systems have more registers (16 general-purpose registers vs. 8 in 32-bit), larger address spaces (up to 128 TB for Windows processes vs. ~2 GB for 32-bit), and different calling conventions for passing function arguments.
Memory and Address Spaces
A process's address space is the range of memory addresses it can read and write to. While theoretically massive (up to 128 TB for 64-bit Windows processes), the OS reserves portions for the kernel, and most processes use far less in practice.
This address space contains everything the program’s data and executable code. It's all binary data stored in memory. Each address in this address space points to a single byte.
When you inspect memory in a debugger, executable code regions are disassembled into assembly instructions, data regions are displayed as hex bytes or ASCII strings, and the stack shows function calls and local variables.
Binary and Hexadecimal
Raw data is usually displayed in Hexadecimal (hex). Hexadecimal is a base-16 numbering system that compresses binary into something manageable. Each hex digit represents four binary bits and can have 16 values (0-15, written as 0-9 and A-F). So a byte (8 bits) is represented as two hex digits.
| Decimal | Binary | Hex |
|---|---|---|
| 0 | 0000 | 0x0 |
| 8 | 1000 | 0x8 |
| 10 | 1010 | 0xA |
| 15 | 1111 | 0xF |
| 255 | 11111111 | 0xFF |
Eventually you’ll be able to spot addresses and ASCII strings in hex, but you still won’t be able to understand what you’re looking at most of the time. That’s part of the fun of reverse engineering.
Registers
Registers are small, extremely fast storage locations built directly into the CPU. They're used to hold data that the processor is actively working with.
The naming convention differs between architectures. In 32-bit (x86), general-purpose registers start with e. In 64-bit (x64), they start with r. 64-bit systems also have additional registers: r8 through r15.
x86/x64 registers can be accessed in smaller segments. Taking rax as an example:
This means you can manipulate just part of a register. For instance, mov al, 5 only changes the lowest byte of rax, leaving the rest unchanged.
The following are common general purpose registers.
| Register | Purpose |
|---|---|
rax / eax | Accumulator - used for arithmetic operations, and more importantly, return values from functions |
rbx / ebx | Base register - often used as a pointer to data |
rcx / ecx | Counter register - used in loops and string operations |
rdx / edx | Data register - used in arithmetic and I/O operations |
rsi / esi | Source index - used for string and memory operations (source pointer) |
rdi / edi | Destination index - used for string and memory operations (destination pointer) |
rsp / esp | Stack pointer - points to the top of the stack |
rbp / ebp | Base pointer - points to the base of the current stack frame |
rip / eip | Instruction pointer - points to the next instruction to execute (cannot be directly modified) |
While these registers have historical purposes, modern compilers use them more flexibly. However, certain conventions remain important, especially rsp, rbp, rax, and rcx
Intel Syntax Assembly
There are two main syntaxes for x86 assembly: Intel syntax and AT&T syntax. This guide uses Intel syntax, which is the default in tools like x64dbg and IDA Pro and is more commonly used in malware analysis.
Intel syntax follows this general format:
instruction destination, source
For example:
mov eax, 5— Move the value 5 into theeaxregisteradd ebx, ecx— Add the value inecxtoebxand store the result inebxmov [eax], 10— Move the value 10 into the memory address pointed to byeax
Key concepts:
Operands: Most instructions operate on one or two operands (source and destination). The destination is where the result is stored.
Immediate values: Literal numbers in the instruction, like mov eax, 5 (5 is an immediate value).
Memory addressing: Square brackets [] indicate memory access. For example:
mov eax, [ebx]— Load the value from memory at addressebxintoeaxmov [eax], ebx— Store the value ofebxinto memory at addresseaxmov eax, [ebx + 8]— Load from memory at addressebx + 8
Size specifiers: Sometimes you'll see size hints like byte ptr, word ptr, dword ptr, or qword ptr to specify how much memory to read/write:
mov byte ptr [eax], 0xFF— Write one bytemov dword ptr [eax], 0xFFFFFFFF— Write four bytes (32 bits)
Types of Instructions
Assembly instructions generally fall into three main categories:
Data movement: Moving data between registers and memory. Stack operations are specialized data movement instructions that place data in memory relative to the stack pointer.
| Instruction | Definition |
|---|---|
mov | Move data from source to destination |
lea | Load effective address (calculates address without accessing memory) |
push | Push value onto the stack |
pop | Pop value from the stack |
enter | Set up stack frame for function |
leave | Tear down stack frame |
Arithmetic and logic: Performing calculations, bitwise operations, and comparisons. Instructions like cmp and test compare values or test bits without storing results, setting flags that control subsequent execution.
| Instruction | Definition |
|---|---|
add | Add two values |
sub | Subtract two values |
mul | Multiply values |
div | Divide values |
and | Bitwise AND |
or | Bitwise OR |
xor | Bitwise XOR (exclusive OR) |
not | Bitwise NOT (complement) |
cmp | Compare two values (sets flags without storing result) |
test | Bitwise test (typically used to test if bits are set) |
Control flow: Changing the execution path. This usually means manipulating the instruction pointer. Conditional jumps are usually used to control flow inside functions (they denote if/else statements), while call and ret are used to call and exit functions.
| Instruction | Definition |
|---|---|
jmp | Unconditional jump to address |
je / jz | Jump if equal / jump if zero |
jne / jnz | Jump if not equal / jump if not zero |
jl | Jump if less than |
jg | Jump if greater than |
call | Call a function (pushes return address and jumps) |
ret | Return from function (pops return address and jumps) |
This should be enough to get you started. Check out the Reverse Engineering and Malware Analysis Intro Module to see how it works in action:
